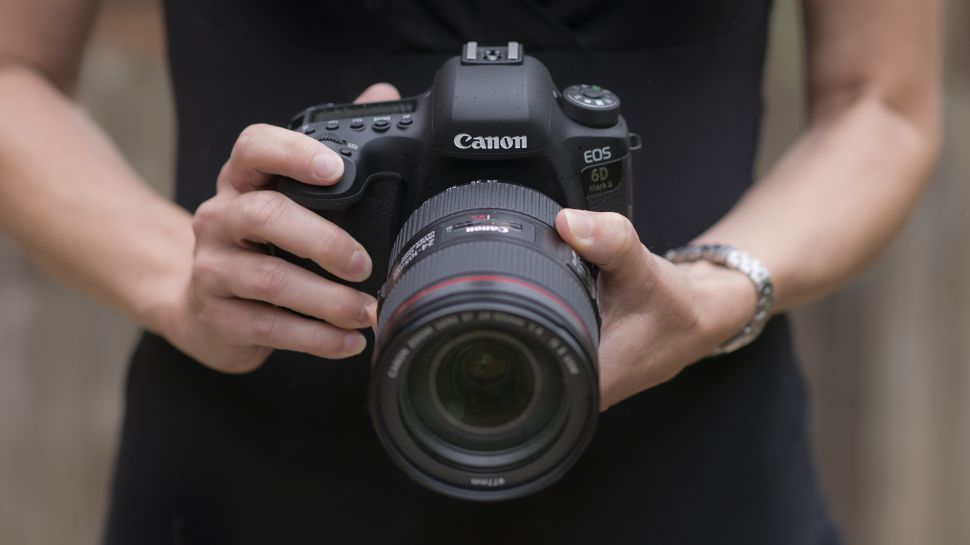
We’ve put together 49 essential Canon DSLR photography tips and tricks specifically to help you get to the grips with your camera and all the great technology therein.
Many Canon owners never do much more than scratch the surface of their camera’s capabilities. However, like an iceberg, seven-eighths of the DSLR’s features remain unseen and unused!
Some of this is down to the user’s inexperience or unfamiliarity with the camera, but a lot of it also boils down to how the camera’s been designed.
Canon has squeezed in so many features, it’s not always obvious how to access them (and the manual isn’t always much clearer).
From basic stuff, like how to shoot in raw format, through to advanced shortcuts aimed at pros, you’ll find everything you need to take better shots faster.
Here’s what you need to know about using your Canon DSLR…
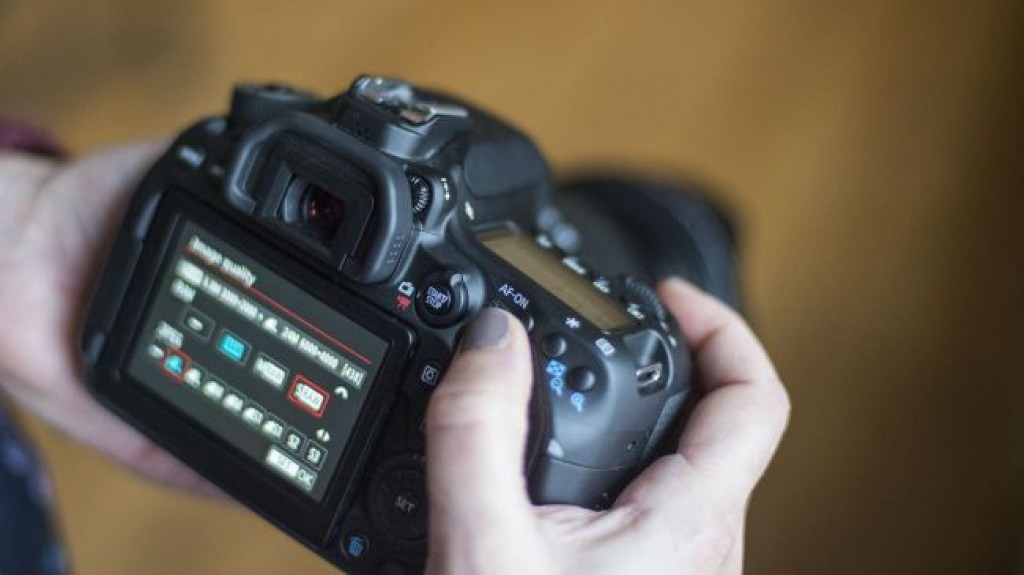
1. Select the raw image setting
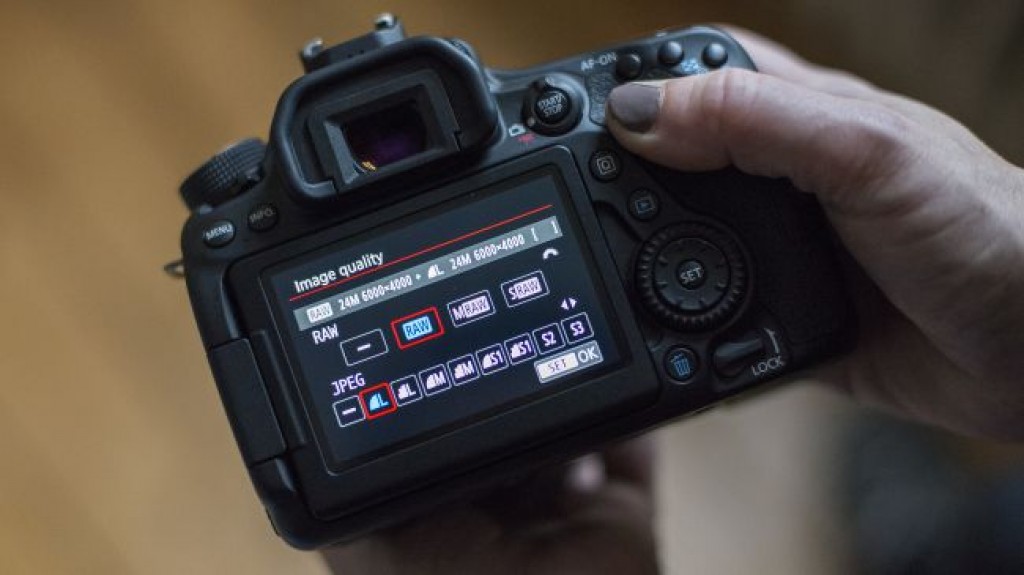
Your EOS DSLR gives a wide range of image quality options, but to get the best results you should always go for uncompressed ‘raw’ files. Raw images reveal the best range of tones – and give greater flexibility when editing with software. It’s almost always worth the extra space raw files take up on your card, while you can shoot JPEGs as well if you’re not sure.
2. Go large
Although you should use raw most of the time, there are occasions when it can pay to compromise with the JPEG options in the Quality menu. Choose the ‘Large’ high-quality JPEG option when shooting a series of continuous shots and your camera will keep firing for longer.
3. Space-saving
The high-quality Large JPEG setting is also a handy option if you’re running out of space on your memory card because you forgot to carry a spare card.
4. Firmware updates
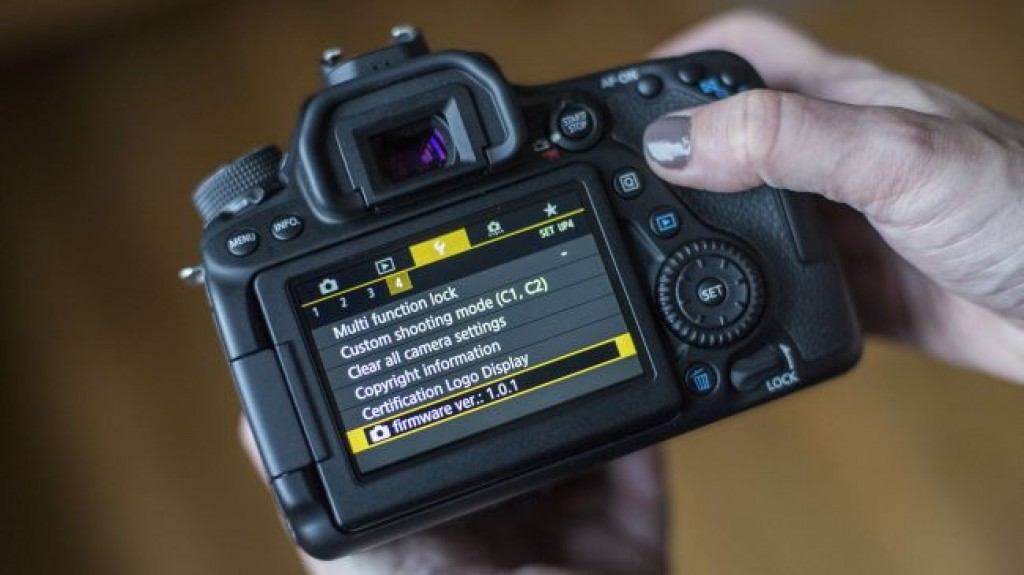
Canon continues to improve the reliability and performance of its cameras, even after they have left the factory. That’s why you should regularly check the latest ‘firmware’ available for your EOS DSLR. See which version you’re using in your camera’s menu. Then log on to Canon’s website and search firmware updates to see if your camera models needs updating.
5. Make the most of Live View
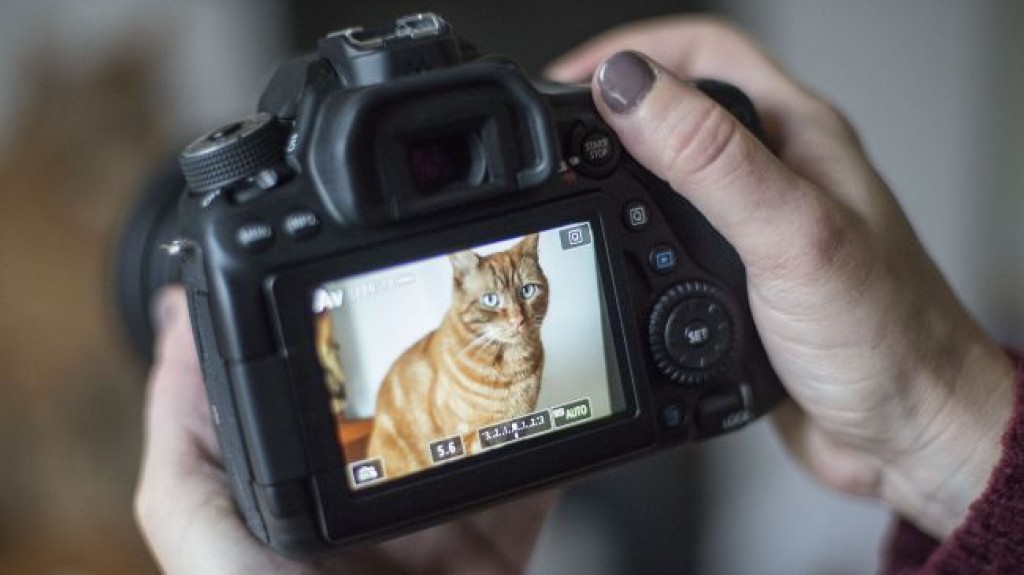
Live View, where you see what the camera ‘sees’ on the rear LCD screen, is found on all recent Canon EOS models, but is switched off by default, but there’s now a dedicated switch to activate this on the camera body.
The feature is useful for a wide range of subjects and lets you use the LCD to frame shots – it’s particularly useful when using your Canon on a tripod.
6. Try sRaw
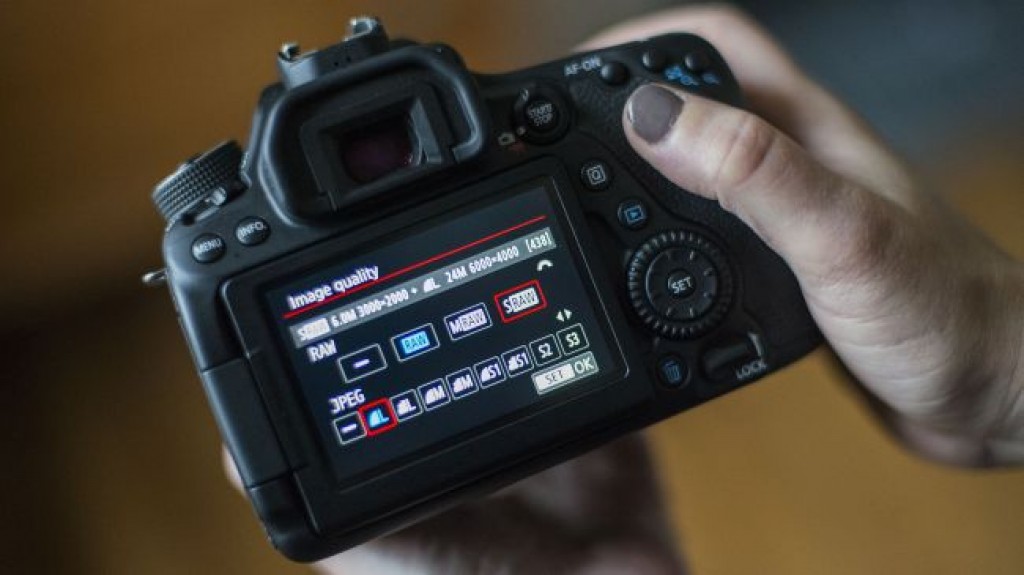
As well as being able to shoot JPEG and raw files, many modern EOS DSLR also allow you to shoot in sRaw, which offers many raw benefits while taking up less card space. But, sRaw means that the camera is using fewer pixels, so you won’t get the same resolution or quality as raw proper.
7. Adjust your Dioptre
See things more clearly as you shoot by adjusting the viewfinder to your eyesight. The Dioptre, a mini thumbwheel at the top-right corner of the viewfinder, enables you to adjust the optics inside. Turn it while looking at the clarity of the numbers you see in the viewfinder, not at the image itself.
8. Shine a light
In low light, you can have difficulty seeing all your camera settings clearly. Use the full size of the rear LCD to help guide the way – the settings will be shown on the screen if you press the Disp or Info button as you set up the shot (the button you use depends on the model of EOS you own).
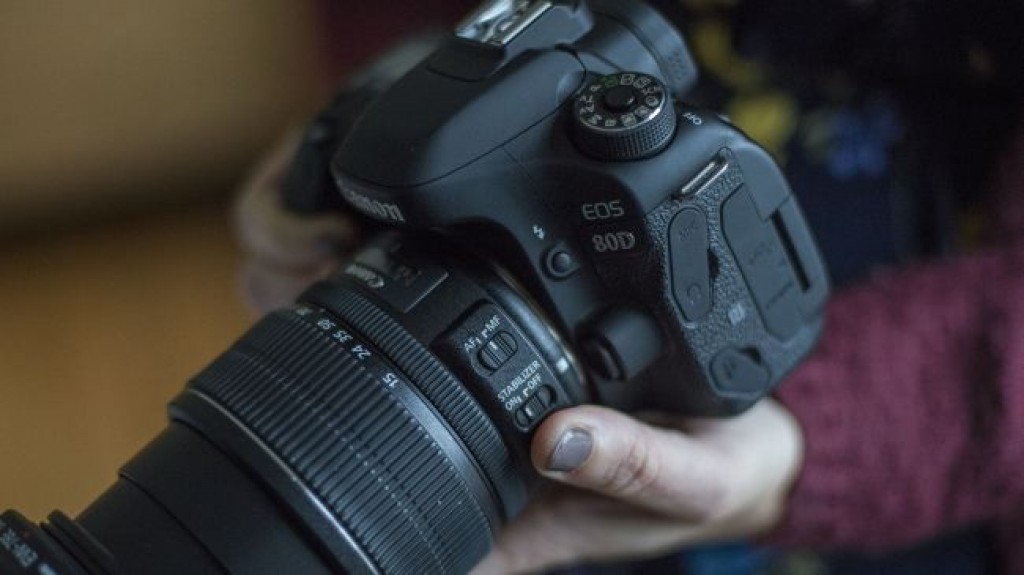
9. Top light
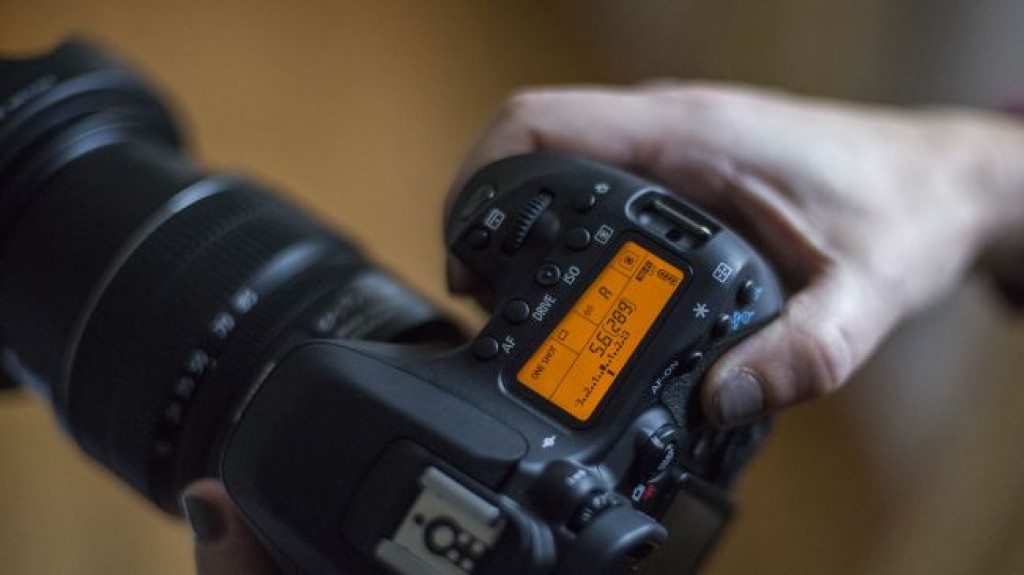
If you have an EOS with an LCD on the top (such as the Canon EOS 80D), this can be lit separately if you press the lightbulb button top left of the screen.
10. Adobe RGB
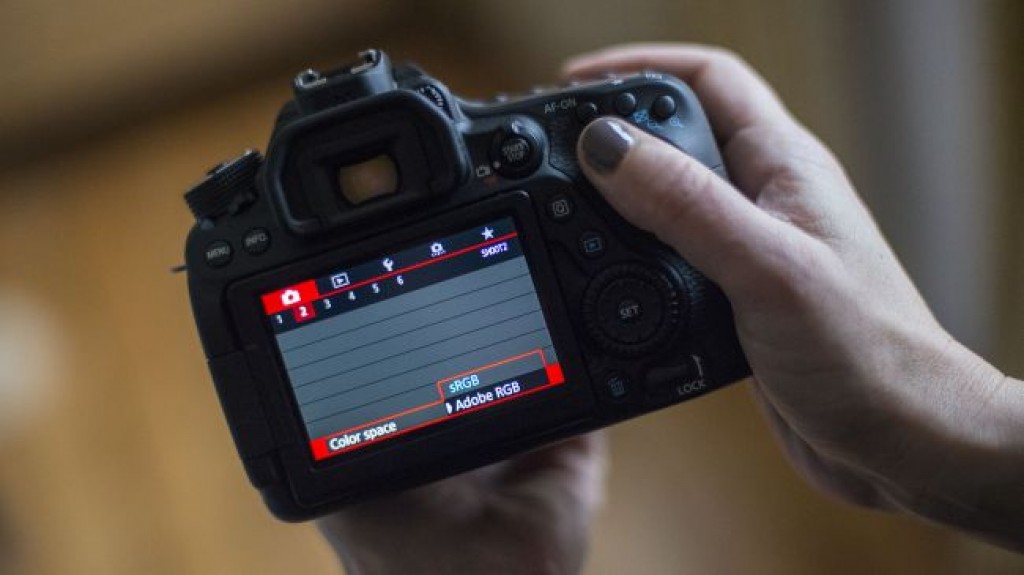
Buried in your menu is an option called Color Space. This comes preset to sRGB, but you will record a wider range of colours if you set it to the alternative Adobe RGB setting. This gives better printing results.
11. Format/erase
Before you go out shooting for the day, delete any pictures on the card you’ve already downloaded to your computer. It’s easier to erase them all in one go, rather than one at a time. Use the Delete All command, or the Format menu option. Delete All simply removes all the pictures (except those locked using the Protect facility). Format has the advantage of deleting all data on the card – including all pictures – whether protected or not.
12. Keep quiet
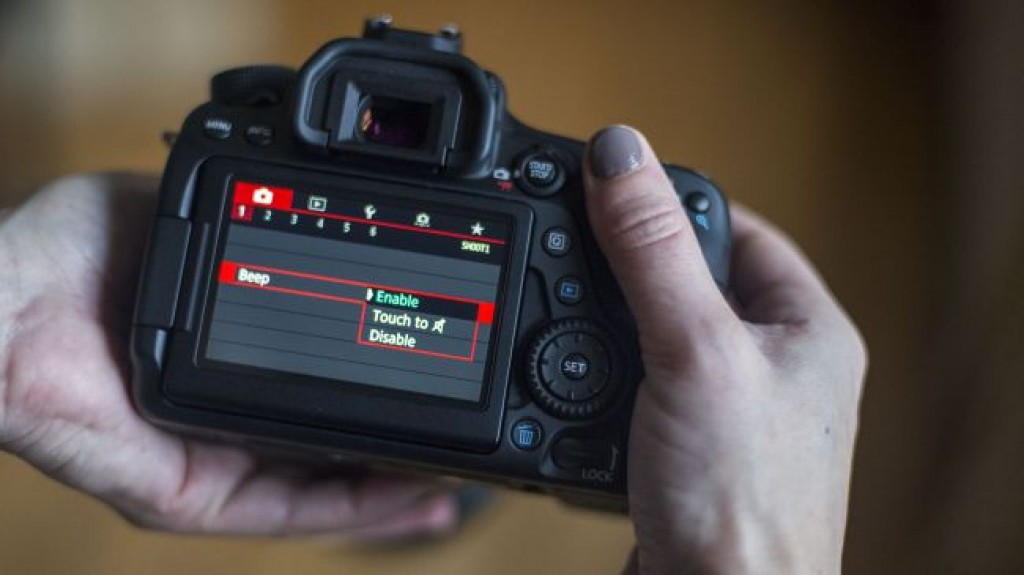
Sick of the focusing confirmation sound? The Beep option in the Menu is on by default; turn it off to avoid scaring wildlife!
13. Back to default
If you get carried away with these tweaks and want to go back to your DSLR’s ‘factory fresh’ settings, use the Clear All Camera Settings option in the menu. The camera will be set back to the way it left the factory. You can then start to customise it all over again!
14. Make sure you’re saving your shots
Set the ‘Shoot W/O Card’ option to Off. The On option is good for demonstrating the EOS in the shop, but is a liability once you’ve bought the camera, because it allows you to take pictures without a memory card.
15. Why Canon Picture Styles are worth a look
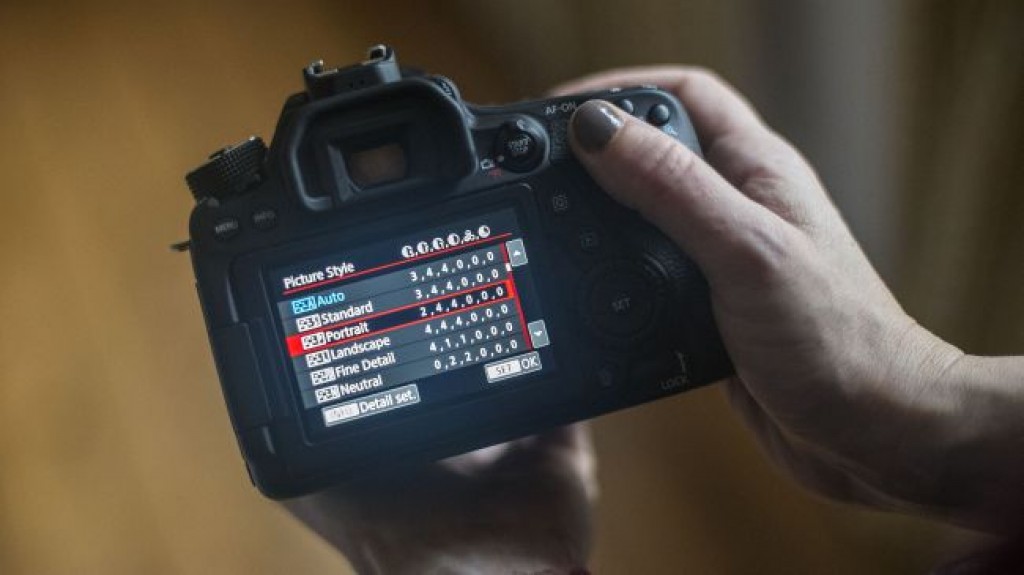
If you shoot raw as we recommend, Canon’s sophisticated Picture Style options have little obvious benefit. Picture Styles enable you to adjust the saturation, sharpness and contrast of your JPEGs. These settings are easily altered using an image-editing program. However, they still have their uses….
16. Accurate preview
Picture Styles are useful as they provide you with a better preview of the pictures you have just taken, enabling you to visualise how the picture will look once you’ve processed the shot on your computer. The Landscape option is one of our favourite Styles, as it gives you punchy-looking pictures in most situations.
17. Get in the right mode
Note that you need to shoot in your camera’s P, Tv, Av, M or A-DEP mode in order to use Picture Styles.
18. Experiment with Picture Styles
Picture Styles give lots of choices. Use the Monochrome Picture Style to work out what subjects are best for black and white conversion (although shoot in raw and the images will still be recorded in colour).
Paradoxically, keeping the colours will give better-looking results when you convert to black and white using photo-editing software.
19. Customise your own Picture Styles
There are a range of Picture Styles, but you don’t always have to use the presets – you can customise them to suit. Saturation and contrast can be tweaked, while in Monochrome you can add traditional filter effects or toning.
You may need to pick the Style from the main Menu, rather than using the Style key, then press the Disp. or Info button to access the various sliders.
20. Program shift
The P (or Program) mode is more useful than most people give it credit for. It sets the aperture and shutter speed for you, setting the values depending on the light level and your lens.
However, P isn’t about just pointing and clicking – you can change the shutter speed or aperture as you use it (just rotate the thumbwheel behind the shutter button). This is handy when you want to fine-tune what your EOS is doing automatically.
21. Av appeal
Av is a great all-round mode for taking creative photos. You set the aperture using the Main Dial and the camera sets the shutter speed, taking into account the Metering mode and Exposure Compensation you have set.
22. Av for speed
Av mode is just as useful for setting a specific shutter speed as it is for dictating the aperture. It’s simple: if you want a top shutter speed, you simply turn the Main Dial until you see the number you want appear in the viewfinder (achieved by you widening the aperture). It’s a much more flexible mode to use than the similar Tv option – where you set the shutter speed, and the camera sets the aperture.
23. Easy ways to adjust exposure
There are lots of exposure modes and metering options on your EOS, but the simple way to check exposure is to take a picture and then look at the result on the LCD, whatever settings you have used.
You can then use Exposure Compensation to make the next picture you take lighter or darker to suit. With popular EOS models you press the Av+/- button then rotate the Main Dial behind the shutter. A negative setting makes the picture darker, a positive one makes it lighter.
24. How much Exposure Compensation?
If the subject is predominantly black, the camera will tend to overexpose the shot, so use a negative setting. With a predominantly white or light scene, set Exposure Compensation to +1 or +2 for a good balance.
25. Partial Metering
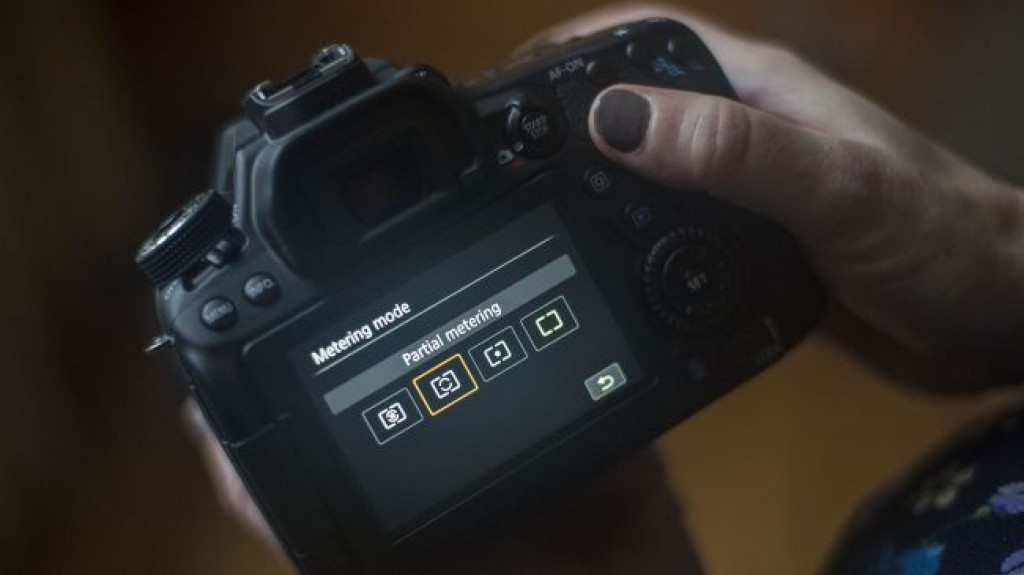
Subjects photographed against a bright background or dark backdrop will need Exposure Compensation to avoid appearing as shadowy silhouettes. You could also switch the Metering mode to one that just measures the brightness from the centre of the screen. We find that Partial metering works well in most situations.
26. Other metering modes
Two other Metering modes to try with your camera are Evaluative and Centre-weighted. Evaluative is pretty intelligent, but not infallible, while Centre-weighted can be easier to predict and adjust for.
27. Focus Lock
One of the handiest DSLR features, Focus Lock gets the autofocus (AF) to focus on a specific part of a scene. Access it by using the One-Shot AF mode, then gently press on the shutter release for the AF system to spring to life – it will then lock when it has homed-in on its target. Keep your finger half-pressed down and recompose your shot, then press the button fully.
28. AE Lock
A disadvantage of Focus Lock is that by default it locks exposure as well as focus. This can lead to inaccurate exposures. You can avoid this by using the Exposure Lock button at the back of your camera (marked with a star). Use the Focus Lock, as above, then when the shot is recomposed, use the Exposure Lock button to reset the exposure before firing.
29. Use Automatic Depth of Field (A-DEP)
A-DEP mode is the easy way to maximise depth of field, so all key areas in the image stay sharp. It works using the seven or nine AF points found on consumer DSLRs, so the lens must be switched to AF. Point the lens and the camera adjusts both the aperture and the focus to maximise depth of field (as well as setting the shutter speed).
30. A-DEP tips
A-DEP can only make use of those AF points it can get a reading on straight away. Check which it is using. Keep half-pressing the trigger until it uses all the focus points that you require.
31. Try manual focus
AF is useful, but in low light (or with some action subjects) it’s more accurate to focus manually. Switch the lens from AF to MF, then turn the focus ring on the lens until the subject looks sharp in the viewfinder.
32. Love Live View
Checking the accuracy of manual focusing is not as easy as it sounds. Use Live View for more accurate results. The zoom option in Live View gives a 10x magnification and a panning option, so you can then focus precisely on any point in the frame.
33. Focus check
You can also use the LCD screen to check the focus on shots you’ve taken. Press the magnifying glass button several times to zoom into your shots, then use the cursor controls to check different areas.
34. Predictive autofocus
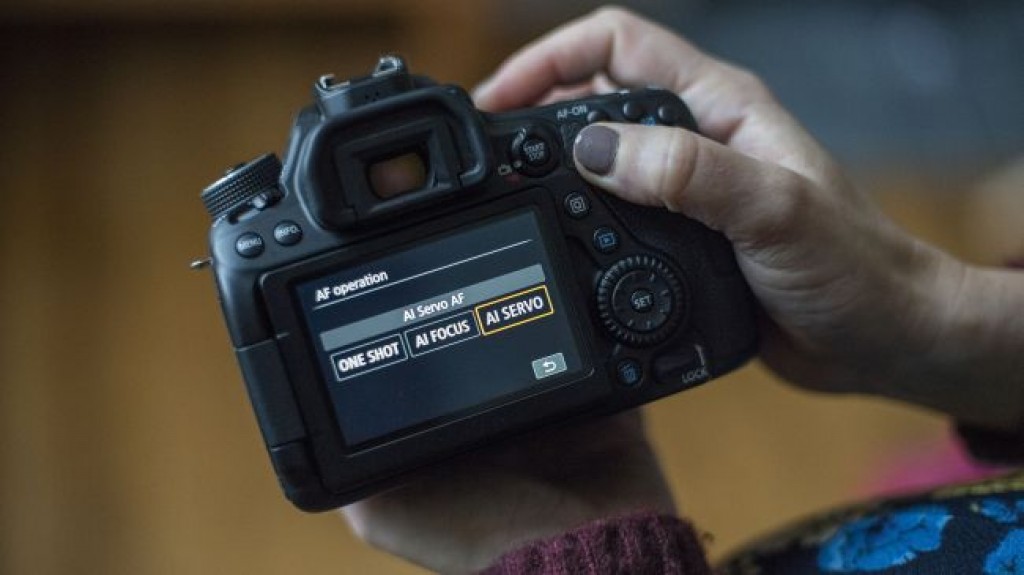
One-Shot autofocus struggles with capturing moving subjects, so switch to the AI Servo mode instead. This not only keeps adjusting focus as you press your finger lightly on the trigger, it will continue to adjust focus during the split-second delay between pressing the trigger and the shutter opening. Perfect for action events…
35. Perfect fill-in flash
Your built-in flash is not just designed for use after dark; it’s extremely useful during daylight, too. It can banish ugly shadows from faces on a sunny day and can add colour to people’s cheeks on grey afternoons.
However, if you use the wrong exposure settings the flash can be overpowering, making the background look unnaturally dark. The answer is to switch your camera to Av mode and then use the flash. The flash is only effective over a couple of metres, so get closer to the subject to make this trick work.
36. High-speed sync
Using an add-on flash doesn’t just give you more power, it brings other benefits too. High-speed sync enables you to use flash with any shutter speed (usually you need to keep the speed to 1/200 sec or below). Using flash at, say, 1/4000 sec is very useful with fill-flash as it means you can use your lens’s widest apertures to blur the background. Great for portraits!
37. Get darker
Use normal Exposure Compensation with flash to darken the background – ideal for moody fill-in flash with richly coloured backdrops. Set the Exposure Compensation to around -1 and see what the shots look like.
38. Flash Exposure Compensation
Flash can sometimes be overpowering in a shot. Set Flash Exposure Compensation to a negative amount (say, -1) for a more subtle fill-in effect.
If fill-flash is not spotlighting your subject, try the reverse and dial in a positive amount of Exposure Compensation.
39. Benefits of Bulb
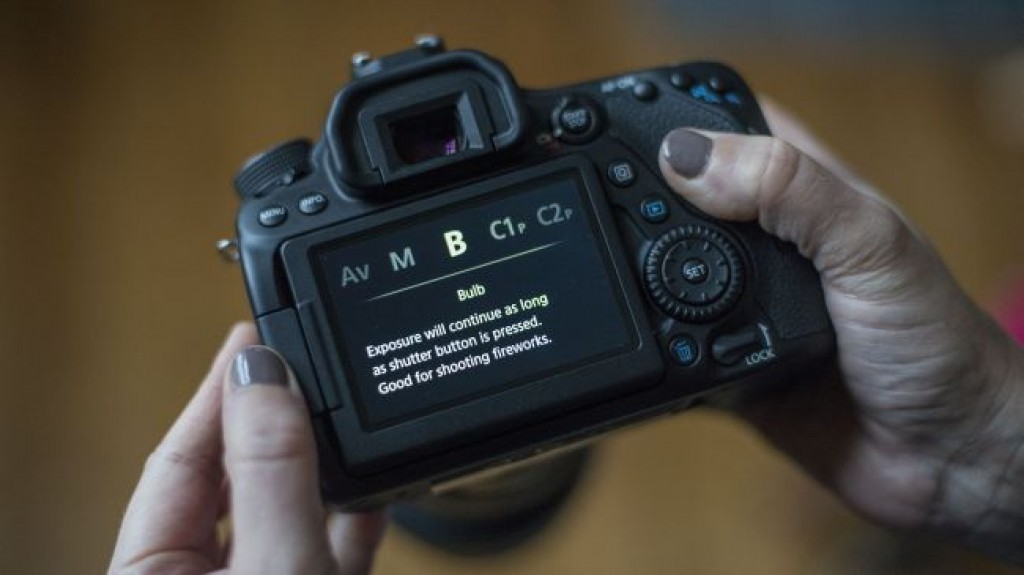
This variable shutter speed setting is designed for when you want exposures of more than 30 seconds long. You press the shutter release and the exposure continues until you release your finger. To cut out camera vibration, however, a cable release must be used. With most EOS cameras, you need to switch to Manual (M) exposure mode to access the Bulb, or ‘B’ mode.
40. Mirror Lock-up
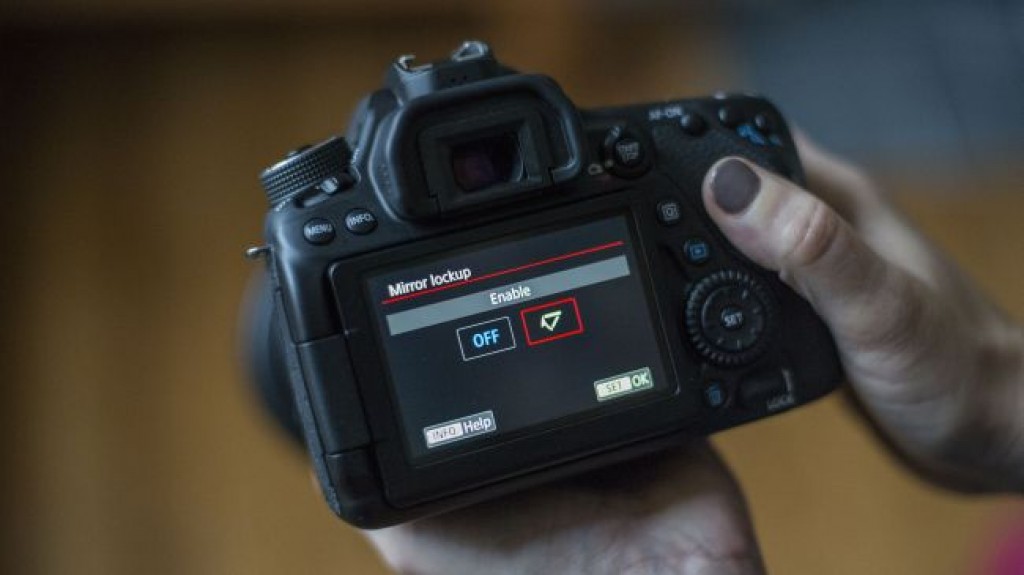
Found in the Custom Functions, the Mirror Lock-up makes long, low-light tripod shots even sharper. It ensures the mirror is raised up well before the exposure starts, thereby minimising even tiny vibrations.
41. Self-timer
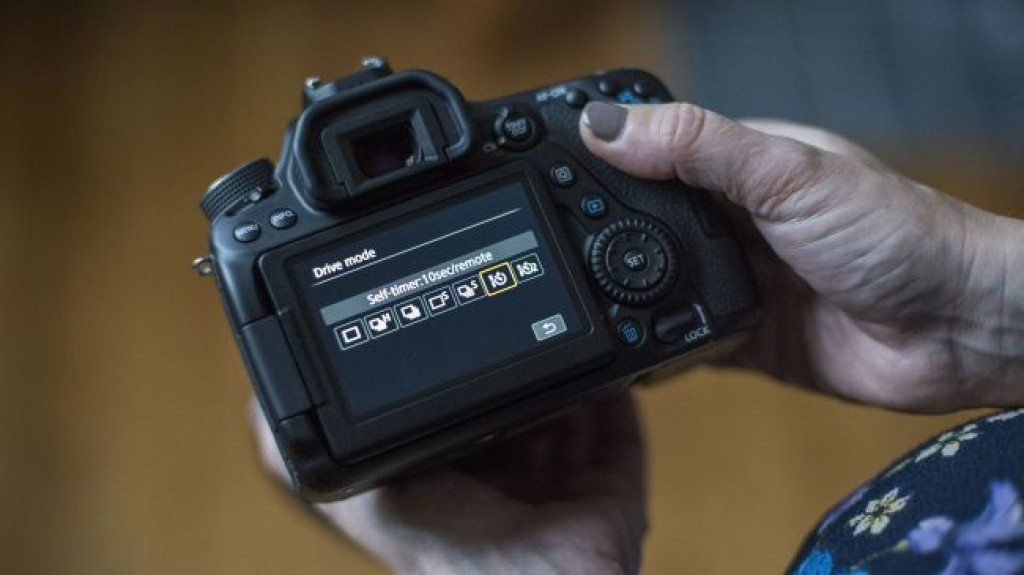
Like Mirror Lock-up, this Custom Function is very useful for cutting out camera vibration when taking long exposures with a tripod. If you use Self-timer and Mirror Lock-up together, the delay is automatically reduced to two seconds.
42. Slideshows
Did you know your EOS camera will play back all the pictures on your card as an automated slideshow? Find the Auto Play option in your camera’s menu, then press Set. It’s even more fun when you connect the camera to your TV with the lead that came in your EOS box.
43. Auto Lighting Optimiser
A useful exposure adjustment Custom Function will automatically adjust the contrast of the image and rescue shadow detail. It’s particularly good at making low-contrast scenes look more punchy. The Auto Lighting Optimiser can also lighten up faces in backlit portraits, and detect when flash-lit people shots are underexposed.
44. Auto Exposure Bracketing (AEB)
AEB enables you to shoot a set of three pictures, all at different exposures. You can then pick the best, or combine the best bits on your PC. As you’re shooting RAW, make sure each shot is at least one ‘stop’ apart.
45. AEB expertise
You can use AEB in tricky lighting conditions in conjunction with Exposure Compensation. With a snowy scene, for example, set Exposure Compensation to +1, then use AEB to take a trio of shots with +2, +1 and 0 stops of compensation.
46. Highlight Tone Priority
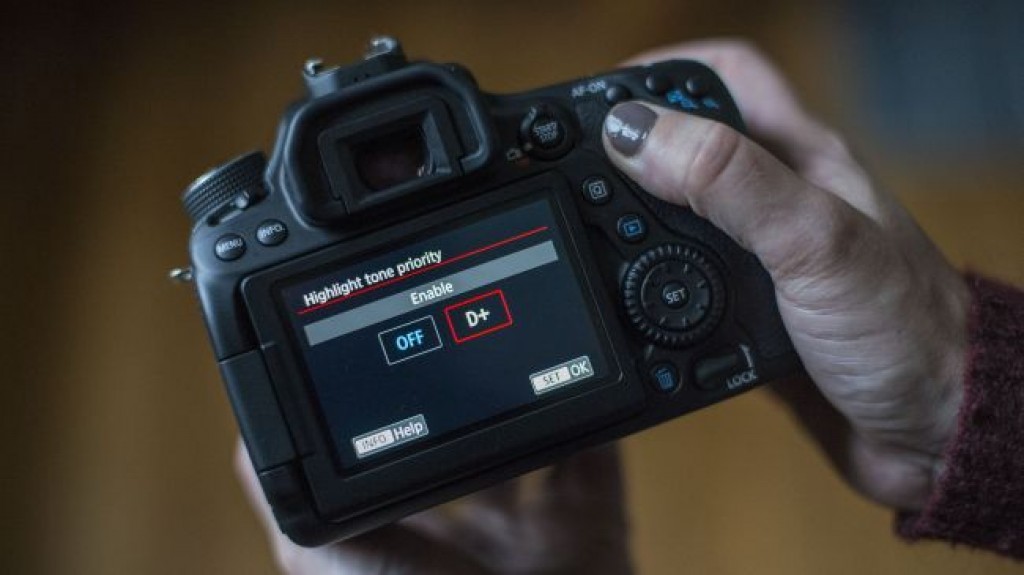
Another Custom Function found on newer models, this lets you get more tonal range from the brightest areas of your pictures. It gives a small but significant advantage when shooting landscapes with lots of white clouds – or mostly white subjects.
47. Lock down your shots
To safeguard your shots, find the Protect Images option, then scroll through your images and click Set on each shot you want to Lock. This stops them being erased with a Delete All command (but not a Format command, so be careful).
48. Use the Q menu shortcut
The Q button is incredibly handy – rather than diving into your camera’s main menu, tap this, and you’ll be granted quick access to a host of key settings. It also gives you a good overview of your main settings.
49. Date and time
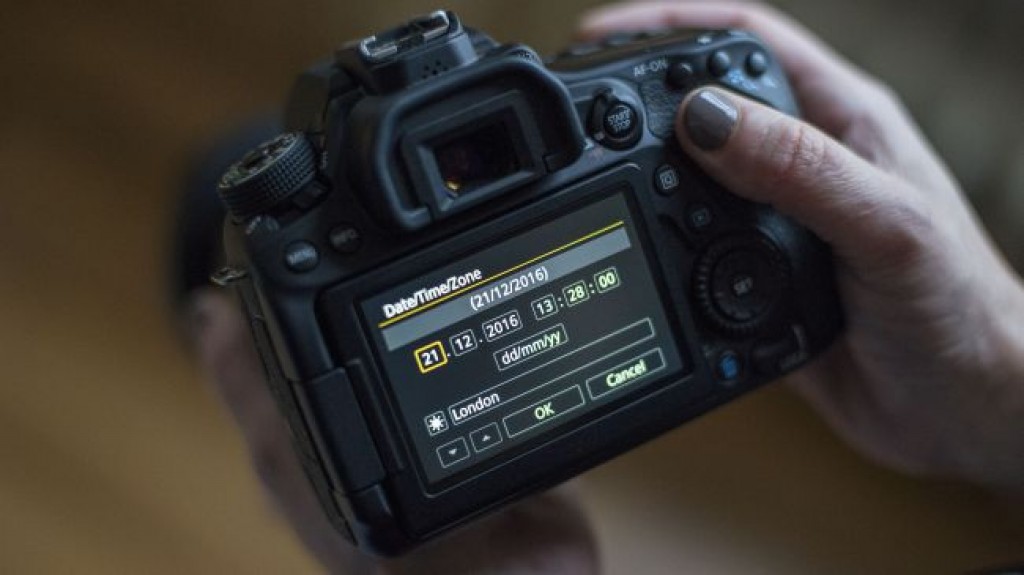
Finally, don’t forget to make sure you’ve got the right date and time set-up. This makes it much easier to track when you took your images when it comes to cataloguing them later.
Source: techradar.com