PROS
- Live streams your prints
- Large build volume
- Simple setup
- Crisp, reliable PLA printing
- Quiet
CONS
- Big and heavy
- Expensive consumables
- Some software niggles
KEY FEATURES
- FDM printing (PLA/wood)
- 250 x 150 x 150mm build volume
- Wi-Fi camera
- 50-350 microns resolution
- Removable, auto-calibrating print bed
- SD slot & USB socket
- 320 x 240-pixel touchscreen
- Manufacturer: Polaroid
- Review Price: £1,499.99
WHAT IS THE POLAROID MODELSMART 250S?
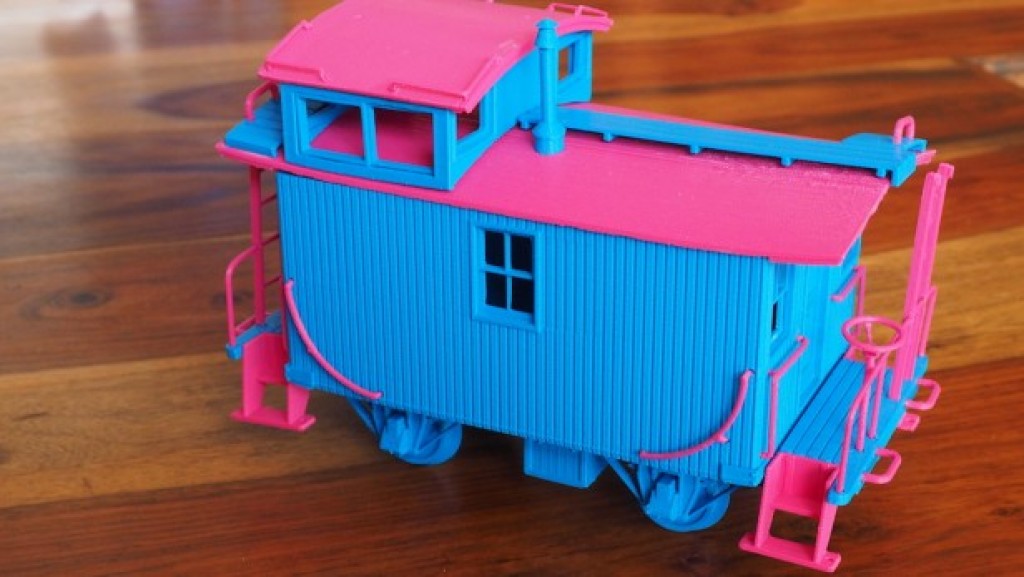
The ModelSmart 250S is Polaroid’s first foray into the world of 3D printing. It’s a large consumer FDM (fused deposition modelling) printer that aims to be hassle-free and home-friendly, thanks to reliable, super-quiet operation.
It also has a couple of neat tricks up its sleeve. A built-in webcam enables you to live stream ongoing builds to your phone via an app, and chip-equipped smart reels mean you’ll always know exactly how much filament you have left to print with.
With so many 3D printers causing untold frustration over the years, could this be the one that finally ticks all the boxes?
POLAROID MODELSMART 250S – DESIGN AND FEATURES
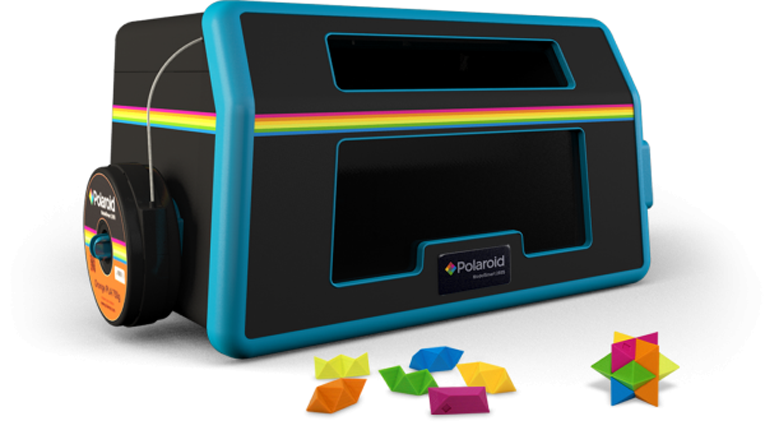
The ModelSmart 250S is both massive and super-heavy. It’s the biggest, heaviest consumer 3D printer I’ve ever had to lift, grunting and perspiring, on to my desk. There’s going to be no hiding this thing, but at least it’s pretty swish-looking.
Long gone are the days when 3D printers looked home-brewed – models such as the Formlabs Form 2 and CEL Robox are smart bits of kit you’d be proud to have on your desk, and this Polaroid follows suit.
The styling is typically Polaroid, with the company’s signature rainbow band running around the charcoal-grey metal body. The large front door is framed with blue plastic and has a pair of windows through which to view your build taking shape.
On the right side of the top plate is a small colour touchscreen surrounded by more of that blue plastic, while the only other control – the on/off switch – is around the back right, above the power socket. Also on the back is a USB socket and an SD card slot.
The holder for the filament is on the left side, and it has an electrical contact for communicating with Polaroid’s proprietary smart reels. These reels are available loaded with either 750g of PLA (polylactic acid) or 750g of wood, although I only got the chance to test the former.
The purpose of the smart reels is twofold: so that the printer sets itself up for the correct material, and so that you can keep track of exactly how much filament is left on the reel.
Open that big door and inside the 250S you’ll see mostly what you’d expect from an FDM printer – a print head running left and right on two rails that are guided back and forth by toothed belts. The glass print bed is unheated and removable, and it provides a decent-sized build volume of 250 x 150 x 150mm.
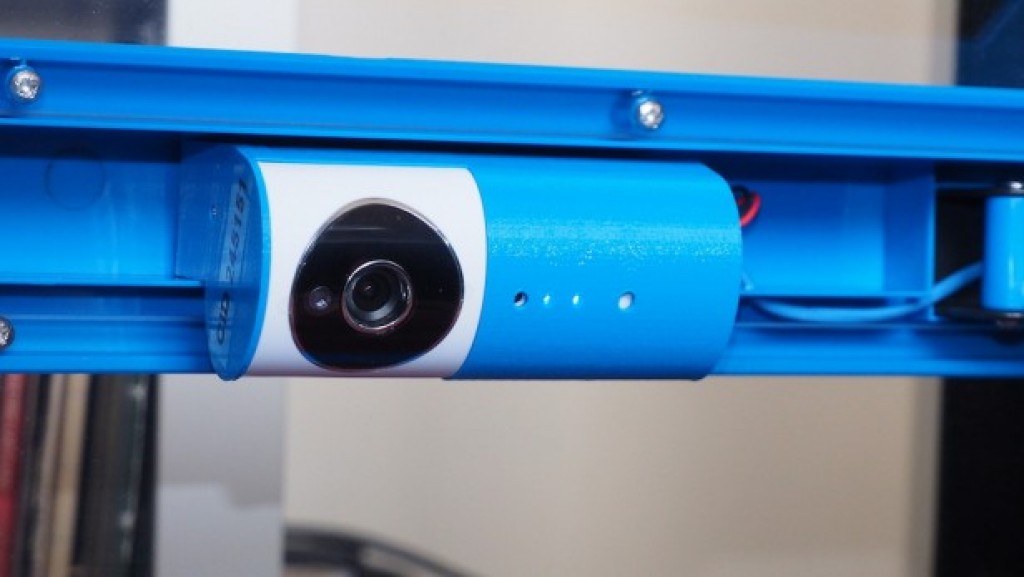
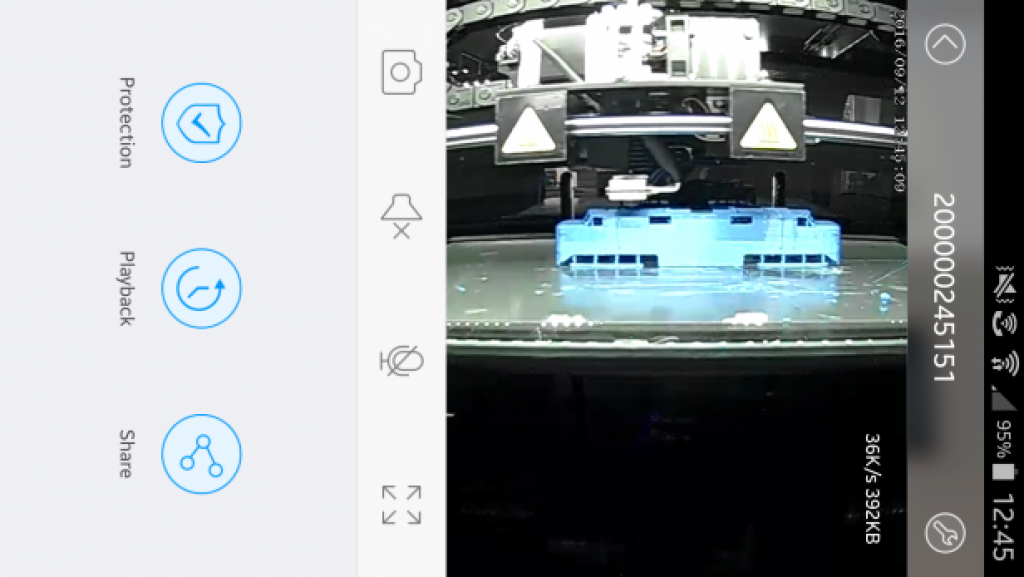
Rather more unusual is that webcam, which is hidden on the inner side of the door, in the partition between the two windows. It’s got a few status LEDs, but only one control – a recessed button for connecting it to your Wi-Fi network.
POLAROID MODELSMART 250S – SETUP
I try not to talk about product packaging, but having had a few 3D printers arrive damaged in the past, it was nice to see how well packed this Polaroid was. It’s definitely a two-person job moving and unloading it, though – I defiantly laughed at the warnings on the box, flexed my muscles and did it all alone. I wouldn’t recommend it.
Setup is relatively straightforward. First you need to find a Phillips screwdriver to attach the filament cartridge holder to the left side with four crosshead screws, then slide the glass print bed in – it snaps crisply in place thanks to a pair of magnets on the front corners.
Loading filament is fairly simple, although not as easy as on the CEL Robox. You click the reel onto the holder, then feed the filament through a length of tubing and in through a hole in the left side of the printer until it reaches the nozzle. Select “Change Filament” from the printer’s touchscreen and then manually push the filament a little more until some begins squeezing out of the print nozzle.

It’s then time to stick a Z-Axis sheet to the print bed. These are double-sided sticky sheets that Polaroid supplies to ensure the print sticks to the non-heated bed. There’s a pack bundled with the printer, but thereafter they cost a jaw-dropping £19.99 per pack of 15.
Thankfully I managed to get multiple uses out of each Z-Axis sheet by either being very careful to prise the print off them without damaging the sheet, or by printing each thing on an area of the sheet that hadn’t been printed on before.
As the glass bed is removable, you could always instead try the old-fashioned (by 3D printing standards) methods of coating the bed with glue from an inexpensive glue stick or covering it with blue painter’s tape.
Sadly, it’s less easy to cut costs with the filament. Polaroid has priced its proprietary cartridges at a whopping £49.99 for 750g of PLA filament and £59.99 for 750g of wood filament. That’s exorbitant by any standards. Sure, they’re smart cartridges, but if that’s the price you have to pay to know exactly how much filament you’ve got left, it’s just not worth it, in my opinion.
To put this into context, branded PLA filament from CEL costs £27 for 700g, while Makerbot charges around £24 for 1kg. Look on eBay and you’ll find unbranded 1kg reels for less than £10.
Polaroid’s justification for the filament pricing runs beyond the chip embedded in the casing, though. Apparently, the filament has been specifically designed for the Polaroid printers, using high-quality virgin material with a tolerance in filament diameter is just 0.01mm throughout its length to ensure smooth running.
As the printer can continue to print even when it knows that a cartridge is empty – it has a manual override – there’s nothing to stop you from feeding it PLA from a third-party spool while an official cartridge is attached. However, you’ll void your warranty if anything goes wrong while using non-Polaroid filament.
The final step before heading into the build software is to set up the internal webcam. To do this, you have to download the Doby app for Android or iOS, register with Doby, then join the Polaroid’s camera to your network by entering its device ID and pressing its Wi-Fi button.
The PolaroidPrep software is available to download for Windows and Mac from Polaroid’s website. With that up and running, you’re ready to prepare a print.
If you’ve had any experience with 3D printers in the past, you might be thinking I’ve missed a stage. No, you don’t need to level the print bed or set the nozzle height – the ModelSmart 250S is self-calibrating. And it does so impeccably. Thank the good Lord.
POLAROID MODELSMART 250S – PERFORMANCE
PolaroidPrep’s interface has been kept clean and simple, which is fine by me. There’s the usual 3D space to which you add your model(s), and you can rotate it any way you want by clicking and dragging, or zoom in and out by scrolling up and down with your mouse wheel or trackpad.
However, I found it a little fiddly to get the orientation I wanted, so it was tough to check whether an object was flat to the bed, if it needed a support structure, or even sometimes what shape it was.
Annoyingly, I discovered that the Mac version wouldn’t load STL files that had been saved in the ASCII format, so I had to re-save them as STL Binary files in the Cura freeware program before I could add them to PolaroidPrep. However, Polaroid tells me this isn’t the case in the Windows version and that an update for the Mac software is due in October 2016 that fixes this.
I also had an issue with scaling – I could seemingly only scale models up or down in increments of 100%. Eventually it turned out I could be a little more precise by selecting the relevant box and using the mouse wheel or scrolling with the trackpad to alter the scale in increments of 10% (one decimal place). It wasn’t exactly intuitive. Again, the Windows version of PolaroidPrep is ahead in this regard, with scaling adjustments available to two decimal places. Neither version, it seems, tells you the exact dimensions of your object, though, which is no help if you want to make sure something is life-size or to a precise scale.
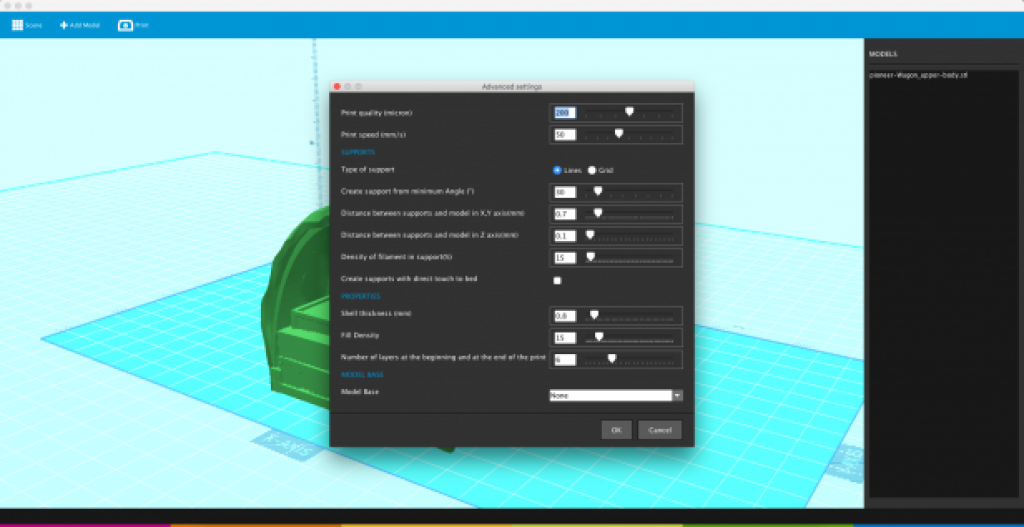
Some of the more in-depth settings are hidden until you click Print and then choose Advanced Settings. It defaults to a resolution of 200 microns and a speed of 50mm/s, but there’s an available range of 50-350 microns at 20-100mm/s. You can also change the fill density, shell thickness and settings related to the supports and whether you need a raft.
I found the default settings for supports to be a little over-the-top and made them difficult to remove, so I’d definitely recommend tweaking that.
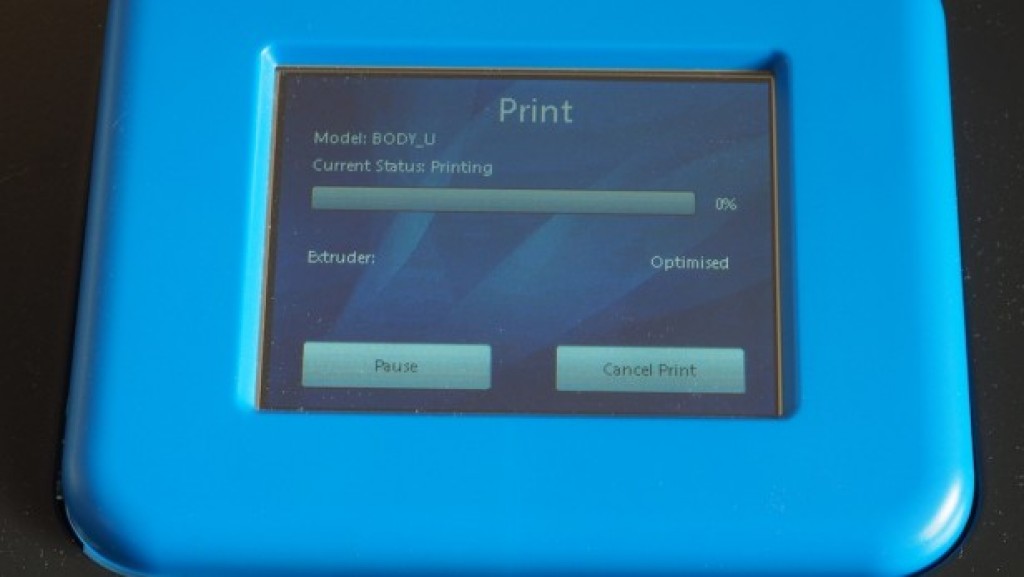
Printing can be done directly from PolaroidPrep if you have the printer connected via USB. Alternatively you can load the prepared EBP files onto the supplied SD card and slot it in around the back. It’s a shame the SD slot hasn’t been made more accessible, as the size and weight of the 250S mean it can be difficult getting to the back panel.
Printing from SD card is pretty straightforward otherwise, thanks to a nice clear menu system on the printer itself. The touchscreen could be a little more responsive, but I got used to it. The one disappointment here is that, although PolaroidPrep tells you precisely how many hours and minutes a print will take, the touchscreen only displays progress as a percentage, which seems like a missed opportunity.
Once the ModelSmart 250S had performed its short auto-calibration routine and started actually building something, I was struck by how quiet it was. From 1m away, it barely got above 30dB. This is a 3D printer that I could actually live with.

Print quality is also very impressive. Even at the default 200-micron setting, detail is as crisp as I’ve seen from an FDM printer, with only occasional minor defects that can easily be trimmed with a craft knife. It can’t quite match the fine resolution and almost lack of layer banding that you get with an SLA printer such as the Formlabs Form 2, but that model is also around twice the price, messy to use and comes with an even higher cost of consumables. The ModelSmart 250S is also far better at printing large surface areas.
Most importantly, I didn’t have a single failed print from the ModelSmart 250S – aside from a moment down to my own stupidity in not realising a particular model required a support structure. Even just a couple of years ago, the amount of time and filament I wasted on failed prints was heartbreaking, so it’s reassuring to see that this Polaroid is so reliable, even with complex shapes.
Much of this reliability is no doubt due to the precision of the auto-calibration and those sticky Z-Axis sheets providing a solid base for the first layer on the non-heated print bed.
Still needs some work, but this model shows what a reliable modern 3D printer is capable of
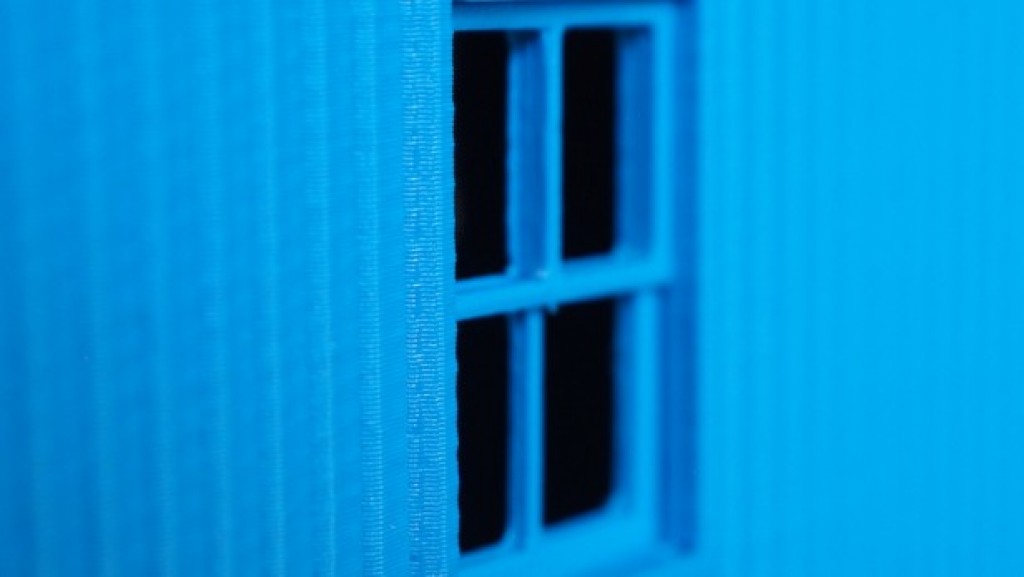
Flat or lightly corrugated surfaces print without splitting and with only very fine banding, even at the standard 200-micron resolution
The ability to live stream prints over Wi-Fi to my phone from the built-in webcam actually proved to be very handy, too. At times when large prints ran over into mealtimes, I was able to take a quick look at progress and ensure nothing had gone horribly wrong. The resolution isn’t good enough to spot subtle printing errors, though, and the video appears sideways in the app. But it’s still a nice feature.
SHOULD I BUY THE POLAROID MODELSMART 250S?
I’m torn by the ModelSmart 250S. It’s a good, quiet FDM 3D printer with a decent-sized build platform, and that built-in webcam is surprisingly helpful in a home environment. The fundamentals are in place for this to be a great 3D-printing option (as long as you have room for it). But there are some serious drawbacks that make it hard to recommend. Encouragingly, its shortcomings are things that could be improved without any change to the hardware.
The biggest issue is the cost of the official consumables – Polaroid has slapped a huge price on its reels of filament, and on the sticky sheets for the build platform. The latter can be overcome to a certain extent, but you’re still stuck splashing out £50 a pop for the proprietary 750g filament cartridges unless you don’t mind voiding your warranty.
With the software tweaked and the price of consumables made more realistic, you could add at least another star to the score.
VERDICT
A quiet, competent 3D printer that’s held back by grossly overpriced consumables.

Source: trustedreviews.com


So they’re going for the inkjet printer business model with massively overpriced consumables.
No thank you.
This is no way to encourage a fledgling market.