Getting started
Quadcopters (drones) used to take hours of practice to master as even the simplest manoeuvres, such as takeoff and landing, could prove difficult. Learning to fly one took time and ultimately determination and before you even took to the skies there was the small matter of building one.
Now that there’s a good selection of pre-built and programmed drones on the market, you can go into major High Street retailers and buy one directly off the shelf. Drones such as the Parrot Bebop and DJI Phantom have revolutionised the market, and slowly there are drones appearing with advanced flight features that make flying and controlling a drone much easier.
The big turning point in drone design was when they got intelligent through small processors being placed onboard that were able to stabilise flight and apply advance features, such as auto-braking, takeoff and landing.
These enabled the pilot to get on with having fun rather than worrying about the mechanics and programming. As the availability of commercial drones has increased in popularity so has the open hardware and software communities. The latest open source drones are challenging their more expensive rivals with advanced features, such as object avoidance and GPS navigation.
This challenge to the commercial models is no real surprise and you don’t have to look too far into the DIY drone community to find out that many of the main manufacturers are extremely active in the open source world and regularly contribute and support those wishing to build their own, eg companies such as 3D Robotics sell autopilot systems that can be programmed through software applications such as Mission Planner.
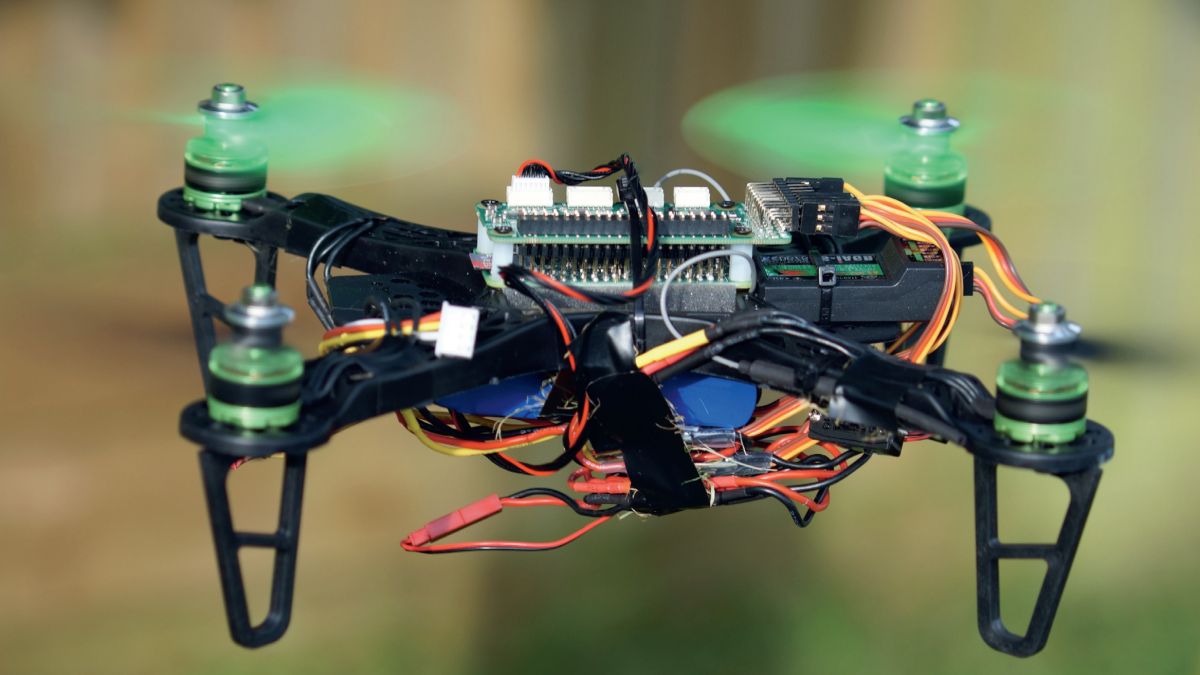
3D Robotics involvement in the community is apparent when you take a closer look at one of their drones. Exploring under the bonnet of the 3DR SOLO, you’ll see that it’s Linux based. The company also run a huge education program and a full SDK is available for the SOLO. We’re going to take a look at building a basic drone from this recent open source community project with the latest Raspberry Pi Zero and Erle Robotics PXFMini.

What you need
Getting started
The first step is to prepare the Raspberry Pi Zero and PXFmini. Fitting the two together is relatively simple once the 40-pin GPIO connector has been soldered onto the Raspberry Pi Zero. The connector is simply a set of two lines of pins that slot into the top of the Zero and corresponding socket on the PXFMini.
The cost of the Pi Zero’s basic board is low at just £4 ($5, around AU$7), but for this project you really need to get the starter kit that includes the unpopulated 40-pin GPIO connector, Mini USB and HDMI cables. A USB hub is also a good idea so that you can connect a keyboard mouse and Wi-Fi dongle.
You’ll actually end up with two 40-pin connectors if you buy this as there’s one included with the PXFMini but it’s worth paying for the other connectors along with the Raspberry Pi Zero.
Soldering in the pins can be a bit of a challenge due to the small size of the board and you must also make sure that the pins have enough length above the board to interface with the PXFMini.
The easiest way to do this is to use some Blu-Tack. We also found that by sanding the pins with a bit of Wet and Dry or fine emery cloth helps the solder to stick.
.")
To prepare the board place the GPIO pins into the Raspberry Pi Zero and turn the board over so you can see the pins coming through the board. Put it on the table so that it’s at about a 45 degree angle and use a bit of Blu-Tack (or Sticky Tack, or any similar material) to secure.
Now push the pins so that there’s only a small portion – a maximum of 1mm – appearing through the board, and use Tack to secure the position of the pins at one end of the board. The Blu-Tack needs to be positioned on pins that we’re not soldering at first, then once one end of the pins is soldered and secured we can remove the Tack and finish the job. If the Tack gets hot then it will burn and become difficult to remove.
You’ll need to solder all the pins and make sure that you avoid any dry solders. A fine-tipped soldering iron with a new tip will make your life easier if you’re not used to soldering.
Building the drone
Once you have the two boards connected you can make a start on the construction of the drone. If you’re doing this using one of the many basic kits out there the process should be pretty straight forward.
Most of the small kits include the basics with a simple bolted together frame, four small electronic speed controllers (ESC), brushless motors along with a battery. The main components and electronics all need to be taped and zipped tied to the frame with only the motors requiring screws.
At this point, it’s well worth leaving the propellers off until the drone is correctly configured. As you put the drone together there are a couple of key points. The PXFmini should be mounted with its connectors facing towards the front of the craft, these pins are used to connect the ESC and the receiver if you’re using an RC unit.

Between the Raspberry Pi Zero and frame, it’s essential that you add a section of foam to provide slight insulation from the vibration of the motors and to ensure that the PXFMini is level. A few additional extras that you’ll need during this part of the build are one male-tomale servo extension and four male and female RC XT60 LiPo connectors.
At the moment the two boards are empty of commands and before they can be used to control the drone they need to be flashed with an OS. This OS, as with all Raspberry Pi boards, is held on an SD – albeit a MicroSD card in this case – that can be quickly installed into the back of the Raspberry Pi Zero.
The OS needed for the drone and for use with the Raspberry Pi Zero and PXFMini autopilot system has been pre-compiled by Erle Robotics and is based on Debian. As long as you purchased the board directly from them the company will email through a link to the latest version of the OS.
If not, it’s possible to compile it yourself although this will be a more advanced task for some of you.
Flashing the Raspberry Pi Zero
The Raspberry Pi Zero can only read the FAT32 file system, so before you continue make sure you have formatted your card correctly and not used exFAT.
With the OS downloaded and the MicroSD card ready, Type in df -h to check the disks attached to your computer. In order to flash the MicroSD card with the latest OS Image you’ll need to unmount the card. If your card is 32GB or over you’ll see that the disk has two partitions so make sure you eject both. Type in:
umount /dev/disk2s1
Now to flash the OS to the card make sure that the file you have downloaded hasn’t been uncompressed and type in the following:
sudo zcat /Path/to/image/PXFmini.img.gz |
sudo dd of=/dev/disk bs=8M
The flashing process can take some time as the uncompressed file is well over 7GB. Once complete eject the card from your computer and install into the Raspberry Pi Zero. The Raspberry Pi must now be connected to a monitor, keyboard and mouse to finish the installation process.
After the Raspberry Pi boots you will see the basic Erle Robotics splash screen and with a bar of Icons showing the different Vehicle projects that the board can be used with. Click the Erle Copter picture and the screen will disappear and the board will reboot.
Leave the Raspberry Pi Zero to run through the boot sequence and this time rather than loading a graphical user interface, the board will boot to a command line showing that the installation has completed and the board can be unplugged.
At this point the drone should be ready for its first flight test. To get it to fly you’ll need to connect it to some type of control device such as a radio control, Bluetooth or Wi-Fi with ROS (Robot Operating System). You do need to take into consideration that this is an open hardware project and the components that we’ll be using will be different to those used by Erle Robotics.
For complete ease, we’ve opted for the traditional radio-controlled option and used a FLYSKY FS-i6 with the new FS-iA6B receiver. The important factor here is that the receiver is of the PPM type mentioned earlier.
PPM enables several servos or in this case several ESC to be connected to one port and controlled individually. This works in just the same way as traditional servos would with an individual port in the receiver for each. This cuts down on the amount of wires needed but more importantly it’s the hardware required by the PXFMini in order to interface with the controller.

Once you’ve connected everything it should work as described here although you may find that some fine tuning of the transmitter controls is needed. The Raspberry Pi Zero doesn’t feature the ability to network over the USB ports, so a Wi-Fi dongle is required in order to connect to your machine. We’ve used a dongle bought directly from Erle Robotics. You’ll need to make sure that your machine has a 5GHz compatible Wi-Fi device in order to get things to work properly.
Once connected you can download and install AMP Planner and run through the calibration and setup process in order to get your drone to work correctly.
Taking flight
Due to the small size of the drone it’s quite difficult to keep things neat as you tuck in wires, wrap insulation tape and zip ties around the frame in order to hold everything together.
Whilst it might seem fiddly and time-consuming to make sure that the PXFMini, Raspberry Pi Zero combo are absolutely level, it’s one of the most important aspects of the build!
From the outset of building the frame you need to continually check that everything about your build is as accurate as possible. The frame kit that we’ve used in this project does the job well despite it being cheap, but there are some of the parts, including the frame legs, that take a bit to fit correctly and have a habit of dropping out.

The only way around this particular issue is to glue them in place, as if one leg falls out during takeoff or landing, the effect as the drone tries to correct itself as can be quite dramatic.
Legs are an easy fix, but there are several other issues with the frame as it hasn’t been designed for the shape or size of the autopilot we’re using. Not only this but the size of the space for the autopilot is too small.
This means that without filling the hole it’s extremely difficult to get the autopilot to sit flat. If it’s not flat then when it takes off it will try to level itself and if you do get it into the air the flight will be erratic.
In order to get around this and also to help cut out vibrations from the motors, we added a large section of foam inside the slot. This helps to bulk out the section as well as create a rough damper for the autopilot to sit on.
The first flight
Before you start double check your drone and make sure that everything is in place and all wires are secure and taped to the frame. As this will be your first attempt at flying the drone remove the propellers so if anything does go wrong the drone will at least stay exactly where it is rather than bouncing round the room poking eyes out and smashing ornaments.
Start by switching on the controller making sure that all switches are in the up position and the throttle is in the lower position. Now connect the battery to the power module and you should hear a beep as the board starts loading which can take up to a minute to complete.
Another beep will highlight the end of the boot sequence and then another 5 to 10 seconds is needed before the drone is ready for testing. On the transmitter, move the left stick to the bottom-right position for five seconds and holding it in place flick down switch D (SWD) which on the SKYFLY FS-i6 is the switch on the top right of the handset.
The motors should now start, flick the switch back up to stop the motors. Now you should be able to use the throttle to start and increase the speed of the motors. If you decide to leave the drone for a short time then the start up process will need to be repeated.
If all is in order and all four motors spin and react correctly with the transmitter then you’re ready to start your first flight once the propellers are attached. If only three motors start or you can visibly see that one motor is spinning at a much lower speed than the others, then you’ll need to load AMP and configure your transmitter with the drone.
Source: techradar.com